Setting up a Planet Technology VIP-156 ATA with FreePBX
... and other SIP providers
I have been using Vonage for home phone service since 2007. There are no complaints about service from me. It was never down when I needed it and the price/feature is pretty good (sans taxes that almost double the bill). But, the family only uses it sparingly and mostly as a default number for anything that needs a number. The service is paired with a Linksys PAP2v2 purchased at the time I originally signed-up for a Vonage account. The unfortunate downside to this pairing is the hardware is locked to Vonage. Fast-forward to mid-2018 and I'm switching SIP providers. I'm looking for lower monthly costs and an opportunity to build my telephony skills via in-house PBX using FreePBX.
An ATA is what allows a "traditional" home phone to communicate over IP with a service like Vonage. It's the least-intrusive change you can take when moving from a landline phone provider since it doesn't require any in-wall wiring changes. To get the best audio-quality experience, however, buy an IP phone and skip the conversions between analog and digitial. But, IP phones are mainly designed for businesses and I really wanted to keep voice-mail functionality on the phone–for voice call-screening. Through several days of searching, my list consisted of three possible choices: VIP-156PE, HT801, and OBI302. I went with the first one mainly because it's the only model to have PoE. Skipping the extra power adapter is a win in my book.
Yes, this is overkill for a residential application and is definitely not needed to make everything work. But, it's a really fun exercise and compliments my drive to "Always Be Learning".
Because I went with a lesser-known ATA, there is not much documentation on how to get it setup for specific providers. It took several tries to get it right and several more tries to identify which parts were really needed. For the following steps, I'm using the default, static IP address of the box: 192.168.0.1 (yours may differ if you are setup for DHCP, etc.). First, navigate to http://192.168.0.1/servdom.htm:
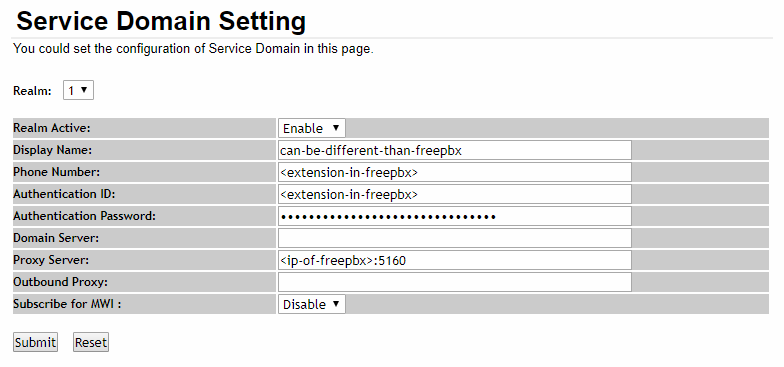
There are six changes that need to be made:
Realm Active to Enable.Display Name for the box. This can be different than the extension's name setup in FreePBX.Phone Number and Authentication ID need to match the number of the extension in FreePBX.Proxy Server needs to point to the FreePBX instance. Note: my setup uses port 5160. Yours may differ.Authentication Password?I saved this for last because it caused the most grief. By default, new extensions in FreePBX are assigned a thirty-two character GUID. At first glance, copying/pasting this into the VIP-156's UI looked okay. But, I kept getting Register Failed when looking at the info-page (http://192.168.0.1/info.htm). Inspecting the password field in the previous screenshot uncovers a maxlength="31" attribute. This meant the last character from the password was getting cut off. You now have two choices: edit the password in FreePBX to be thirty-one characters, or use the browser's dev. tools to change (or remove) the attribute and allow the full password to be entered.
As mentioned earlier, it took quite a bit of trial and error to get this working (even outside the password nonsense). Another source of difficulty came after realizing nothing is even submitted without most of the six "required" fields. This was verified by looking at logs in FreePBX. Here's what you'll see in the logs if the Phone Number and Authentication ID do not match:
[2018-07-02 12:52:37] NOTICE[837] chan_sip.c: Registration from '"Home" <sip:100@freepbx:5160>' failed for '192.168.0.1:5060' - Username/auth name mismatch.
And, for "wrong" passwords:
[2018-07-02 15:17:28] NOTICE[837] chan_sip.c: Registration from '"Home" <sip:100@freepbx:5160>' failed for '192.168.0.1:5060' - Wrong password.
 Bill Boga